4.10.12
3.10.12
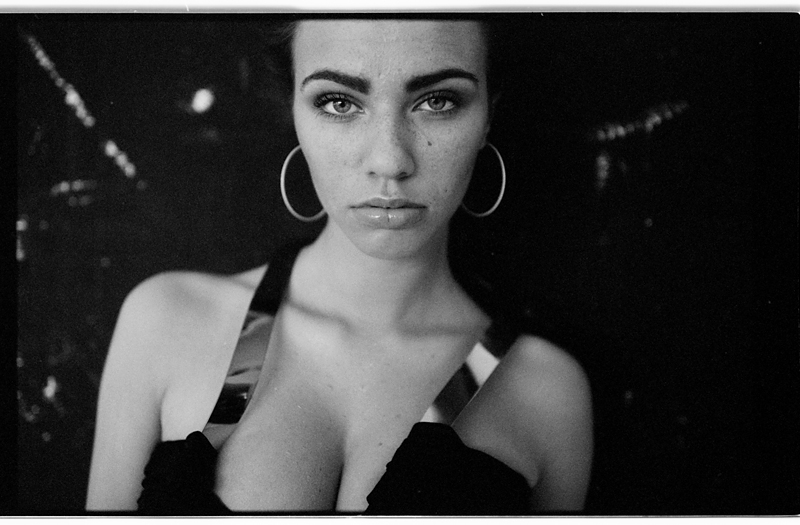
Portfolio of the Week: Niccolò Barone
Dear Readers,
This week we feature another Italian photographer,
Niccolò Barone. He is an autodidact photographer. He works essentially in
medium format (Hasselblad 503/500, Rolleiflex 2.8f, Pentax 67, Minolta
Autocord, Mamiya 645 and some others) and 35mm (Leica M2, M4, M5, M6, Contax
II, Nikon fm and some others) as well as with polaroid and Holga cameras, with
available natural light as his favorite lighting source. His preferred films
are Kodak Tmax 400, 100 and 3200. He develops BW films by himself, usually with
Xtol (Kodak) or Gradual (Ornano) when he shoots at low film speeds, and HC110
or R09 when exposing film at high ISO. Yes, noise and graininess is a matter of
choice for him.
Niccolò’s photography really focuses on many
diffrent things, but essentially on the female form, most images are solitary
and the most part is in black and white. When you look upon the photographs you
get the feeling as the portrayed women have all endured some kind of hurt, not
the physical kind though. All seem lost in their thoughts, gazing out toward
distant lands, even those gazing right through the camera lens, are not really
seeing, expressions are vacant and glazed.
Most of his inspiration comes from the classics, and some from the web where there's a great number of talented photographers and beautiful photographs. He has already been featured in a number of publications, including Vanity Fair. His work is certainly one of the most accomplished you can find on the web. Niccolò’s work can be found on Flickr on his first and second photostream and on his website. Enjoy his photos!
Most of his inspiration comes from the classics, and some from the web where there's a great number of talented photographers and beautiful photographs. He has already been featured in a number of publications, including Vanity Fair. His work is certainly one of the most accomplished you can find on the web. Niccolò’s work can be found on Flickr on his first and second photostream and on his website. Enjoy his photos!


All photos copyright: Niccolò Barone
1.10.12
Monday Column: The Right Tool for a Hill Walking Hike
This Friday my brother, I and our uncle will go hiking in
the beautiful Slovenian Julian Alps. More accurate: We want to get to the
highest mountain in Slovenia. This is Mt. Triglav, 2,864 metres (9,396 ft) high. It’s
a two day hike, first day up, sleeping in the Kredarica hut and the next day
down. It’s a 2200
meters (7,218.2 ft) rise and then descent.

First mountain hut "Triglav temple" at opening 1871
source:http://www.gore-ljudje.net/novosti/52045/
Now, I’m a photographer. So I want to take a
photographic camera with me on the hike. But it’s will not be an photographic excursion,
As a contributor to this blog, would be inappropriate to take with me a digital
camera (I admit I will be using a small P&S for snapshots... I’m guilty).
So my dilemma is which camera to take with me to the hike? Why dilemma? Take your
best camera you own or camera that you could give you the best performance, or
the camera you prefer the most and enjoy shooting with? Hm... Probably the best
camera, none the less of its simplicity, is my Russian large format camera FKD
18x24 cm or 7x9.5 in, with its wooden tripod. It would require a Sherpa to take
it to the mountain top, but they are scarce in those mountains (satire alert!).
Probably the second best quality would give me (loan from my friend) Kowa 66. This
is a medium format 6x6 cm camera. Here is no need for help from Himalayas but it
is large and heavy and bulky. Remember the rise? Much lighter and also with
enough quality would be my Canon EOS 100 and some lenses. Lightweight would be
with 24 2.8 and 50 1.8 lenses. But is also too much bulk, and I already
explained in the last column what’s for me analogue shooting. I have only a
small backpack and must take with me all necessary for two day trip and this
season in mountains has already fell first snow...

Secovlje Saltpans shot with Agfa Isola 1
The
most lightweight option would be my Agfa Isola 1 and Altix-n. First is a medium
format P&S from late fifties and early sixties. It weight’s only 300 g. Problem
is that the number of exposures is limited to only 12. And it has only one
shutter speed (1/30 s) and only two aperture values: cloudy f11 and sunny f16, and quality of the lens is in the lomographic territory (I like it). The other option
is a 35 mm fully manual “guess the distance rangefinder” with nice 50 mm f2.9
lens. But it lacks the mf look and it’s heavier.

Secovlje Saltpans shot with Altix-n
I must decide by myself but I want to hear
your opinion. What do you think about my options and what would you bring to
that kind of hiking from your arsenal?
28.9.12
Cottage Tip: Building a small exposure meter-Part II
I
got (almost) all I need to build the actual meter (save the voltmeter, it
should take quite longer to come, not really sure why). I got the LDR sensor,
so the first thing I did was to build some kind of enclosure and light diffusor
around it. I just recycled a piece of black plastics for the base and the
middle of the (Fuji) film canister cap for the diffusor. I drilled two holes in
the base for the sensor leads and painted the inside of the cap with white
opaque nail polish (taking care to make an even layer). When the nail polish
dried, I glued the sensor on the base and then glued the white-painted cap
onto. I know, it is not exactly a dome-shaped diffusor like in commercial
meters, but probably (hopefully) will do the job more or less in the same way.
It is more like a »hybrid incident light adapter« between the dome-shaped and
the flat diffusor (the ones used to asses the contrast ratio). See photos
below.
 | |
| Starting materials for the sensor: light-dependent resistor (LDR), black plastics for the base, white nail polish and a Fuji film canister cap. |
 |
| LDR glued to the base, and the cut mid-section of canister cap painted inside. |
 | |
| The sensor assembled on the breadbord (don't mind the resistors nearby, they remained from a previous project). |
The
so-prepared sensor was ready for testing! Unfortunately I came home quite late,
so I catched the last sun rays. There wasn't a 15 EV intensity anymore, but
only about 13.5 EV. Then, I measured the
response-resistance down to about 4 EV at different values. I then plotted the dependence of LDR
resistance against light intensity (EV). The outcome was quite a nice
exponential curve (as it should be) with a very good correlationship.
 |
| The testing rig: multimeter measuring sensor's resistance and the Minolta exposure meter for getting the actual EV value. |

I
then used the obtained formula of the curve equation to calculated the
predicted resistance at a given EV value (also for the points I did not
measure). Then, the calculated resistance values served to calculate an
appropriate series of voltage values to be obtained between Rx and R1 (voltage
drop across R1; see the previous
post). For that purpose I used the first part of the formula:
UOUT1=
(UZ2 * R1)/(Rx+R1)
Where
UZ2 is the voltage of the Zener diode (supplying the voltage to Rx
and R1), Rx is the value of the LDR and R1 is the chosen resistor value.
Now,
I must confess, I wasn't really picky about the Uz and R1 values, but I tried
to match them to what I have at hand (and/or combining various values), but
anyway, I wanted to get satisfactory results, at least. So for Uz I chose a
Zener diode with voltage drop of 3 V and for R1 I chose the value of 3200 ohms
(3k+2x100 ohm).
I got this, quite a linear curve:
The
curve equation now tells me that if I want to get the output of about 10 mV/EV I
first need to add (offset) 1290 mV to this (voltage) signal and then divide it
by a factor of about 28.4. Very luckily to me,
1290 mV is quite exactly the voltage drop of 2 regular diodes connected
in series(cca 1.3V)! This is not necessarily the case, but luckily for me, it
was. Otherwise, I would need to use another Zener diode and a trimmer to adjust
the offset voltage, in a slightly different circuit arrangement. Using a
different LDR and light diffuser would
certainly yield different values and curves. For the voltage divider I didn't
use exactly the factor of 28.4, since the calculation gave too much shift from the theoretical
values, especially at high EVs (where the meter is used mostly). Given my
resistor choices, I opted to use 1267 ohms for R2 (1k+220+47 ohm) and 47 ohms
for R3. This gives a ratio of 1:29.57. By applying this ratio and the voltage
bias of 1300 mV (two diodes), it gave me the following (calculated) measurement
error at different values:

At
first, it doesn't look like nice. But, we seldom use a meter below 6 EV (very
dim light), and the error of around 0.3 EV is totally acceptable in practice
for cameras and meters alike. Only between 11 EV and 13 EV the error is quite
large, but as long as we know how much the error is, we can always correct for
it. But clearly, all this is still theory only. The practical measurements will
tell how good or bad the meter is.
Anyway,
at least I came up with the final version of the circuit, with resistor and
diode values to test, and hopefully, solder into the circuit board. See below
(this is only the signal part of the circuit). But let me stress once again: this circuit is (should be) suitable for MY very own case of sensor, not necessarily (or likely) yours!
The
diodes D1 and D2 are just ordinary small-signal diodes. The Zener diode, as said,
has a drop of 3 volts, while the
resistor Rz has been set arbitrarily at 4.7k, just to get a current somewhat
higher than 1 mA, (at high EV values current can approach about 1 mA in this
configuration). Voltage drop across Rz is 7.7 V (12-3-1.3), divided by 4700
yields about 1.6 mA. The photo below shows a more general (and probably also more appropriate) case of a signal circuit-using another Zener diode and a trimmer potentiometer to adjust the bias voltage. The latter is probably the largest source of measurement error in such a meter:
During the weekend I'll test the sensor and circuit on the protoboard (»breadboard«), and I am quite anxious to get the results, which I'll promptly report to you. If time will permit, I'll also get in the final construction till next time.
 |
| The signal part of the circuit I came up with. |
 |
| A more generic signal circuit. |
During the weekend I'll test the sensor and circuit on the protoboard (»breadboard«), and I am quite anxious to get the results, which I'll promptly report to you. If time will permit, I'll also get in the final construction till next time.
Silver
regards
Mitja
CORRIGENDUM: While the circuit in the penultimate photo (without the trimmer pot.) is in principle OK, your restless editor forgot for a moment a basic aspect of Ohm's law, and a vital coefficient....Therefore, the correct values for R2 and R3 are 1.267 M ohm and 47 k ohm, respectively. I apologize for that.
27.9.12
Plustek OpticFilm 120 update (and a rant)
It was one of the first posts on the blog about this medium format scanner. The actual market release date still seems to "float". When should this happen? Who knows, I don't. The vendors have been accepting preorders for the scanner for quite a while now. The feaures look promising, at least on paper. Not so for the price. Wex Photographic offers the scanner (in pre-order, of course) for £1999. Wow, that's serious money, 2.5k€! In these days people get a medium format camera in mint condition for some 15-30% of that amount! And you can get a (used but working, of course) Imacon or drum scanner for that sum.....I really do not understand who will ever buy such a monster (price-wise). If one needs to scan MF film for sharing online, then a Canon or Epson flatbed does the job just right, for 10% of that price. When you ever need high quality scans (exhibitions, print sales), then it's just better to pay a professional to do that. But yes, it is a problem to find a good professional these days.....I don't know for you, but I'm not gonna buy it. Not in a million years. If I ever get crazy one day, I'll get to scavenge an old drum scanner....and a SCSI adapter :)
26.9.12
Portfolio of the Week: 4Spo
Dear Readers,
We have moved
back to Germany and feature another great photographer from this great country, 4Spo.
Of course, 4Spo is not his real name, as he wanted to preserve his privacy, but that's his username on Flickr. And that's OK, we respect your privacy-it's your work
that counts. He is with no doubt a modest guy, even though his work tells
another story, and he mainly defines himself as a fan of Peter Lindbergh. No doubt he is a die-hard guy as well! After
a few years, he happily came back to film, using the many fine cameras in his
possession: Leica, Plaubel, Hasselblad, Nikon etc. He has no particular
preferences for film brand or type, but he likes very much expired film for its
unpredictability and the effects it gives. Possibly with the lens wide open-another
bokeh fetishist, I would say. He states that he likes the subtle eroticism in
photography, with a nice bokeh, with the great help of film medium. And he
obviously makes his job right! Also in the fashion/editorial field. Enjoy his work! 4Spo's work can be found of Flickr on his website, along with his colleague work.
Mitja


24.9.12
Monday Column: Analogue Photography as Escape from Digital World - Part II
Last Monday column I wrote about analogue photography as
escape from digital world. In this
column I will tell about things in analogue photography that differentiate analogue
photography from modern digital world and which I love.

You are already familiar with all sorts of digital and
electronic helps and shortcuts found in modern digital and not so modern
analogue cameras. A few classical photographic electronic helps found already
in cameras made in 70-ties and before. We are all familiar with metering in our
cameras, P, A, T (S), and M modes. Aperture and shutter speed is controlled electronically
from mid-seventies Canon AE1 camera or maybe even before that. Now days you
have face recognition, smile shutter, all kinds of scene modes that help
consumers, amateurs (not that I underestimate amateur photography and “casual” photographers)
and people who know nothing about photography except phrase “smile” or “cheese”
and then they press shutter button in one move, all way down... There are all
sorts of these so called scene modes; from helpful like portrait, landscape and
action, to downright bizarre ones like candlelight, sunset, food, party, or
even pet scene modes. And then are so-called effects, for people who are not
familiar with post production, like B&W and sepia, or effects that simulate
some legacy film emulsions, or even pin-hole effect, and so on... Better I don’t
write about live view and video in modern cameras. Sure I missed plenty of
them.

Electronics, firmware and hardware are developing in very high
pace. So every year we have new “useful” features. Some are turning out useful
and most of them really are not. Some of this year’s “new photographic”
features are: Wi Fi incorporated in camera, so you can control camera by your
phone, and wirelessly transfer images, camera equipped with phone android
operating system, so you could benefit with all sorts of application, useful or
not, for your camera. And also you can share freshly taken photos on your favourite
social network... But feature that stroke me most is that on one of new camera that
was presented from giant in consumer electronics at Photokina last week. It is called
Auto Portrait framing function. When it’s
enabled the camera use face detection to locate your subject, crops the image
based on a rule-of-thirds, and resample the picture back up to the same
resolution as is the original shot. Effectively camera decides about framing instead
of you!!! Where this is going I think don’t need to tell.

So whatever these are useful, helpful and needed photographic
tools, I prefer a purist way of taking photographs. With all manual and mechanical
way of controlling my camera. So when I’m taking pictures and they didn’t turn
out in the way I wanted to, it’s only my fault. I prefer working with my light
meter, manually turning knob to specific shutter value, turning the aperture
ring on selected f stop, zone focusing and manually rewind the film... And then,
when I press the shutter button, it’s a pure mechanical joy!
Subscribe to:
Posts (Atom)