19.7.12
18.7.12
Portfolio of the Week: Rolland A. Flinta
Dear Readers,
This week we
feature another photographer from Germany, Rolland A. Flinta. Rolland is a
Hungarian-born photographer and director currently based in Bonn, Germany. He has been keen
about photography since the adolescence and it was about three years ago that
he made a serious decision to dive deeper into it. His re-entrance into analog
photography is relatively late, but nevertheless, he shows good mastering of
the medium. He mostly shoots in medium format. Below the portfolio, there is
Rolland's bio, describing his own points of view and photo-lifestyle. All I can say is: it's never too late to (re)enter
in the magic analog world, and Rolland's work is an exquisite example! Enjoy
his work! Rolland's work can be accessed through Flickr and his website.
Silver regards
Mitja


All photos copyright: Rolland A. Flinta
Rolland's Bio
The
plan for my future is to enhance more and more in photography. What pushes me
on most is: perfection. There is so much to explore and I have the strongest
feeling in me that I haven't reached the end of that discovery process for a
long time yet. This is what keeps me occupied in the near future.
I
was definitely inspired by Richard Avedon exceptionally, by Sally Mann and Herb
Ritts. But there are several famous photographers who inspire me again and
again.
Taking
pictures for me means thinking thousands of thoughts running through my mind,
it means escaping the real world and diving into another. With my work, I
generally try to bring out the best in my models. Very frequently, pictures
turn out to be inspired spontaneously because shooting one picture means having
the following one on my mind. Especially daylight is an important factor for me
due to the fact that I love shooting without flashlights. Playing with light
and shadow fascinates me.
In
summer 2011 I discovered my enthusiasm for analogue photographing. I learn from
shooting to shooting and the analogue photos amaze me more and more. The
complexity and the effort of analogue pictures is much higher on the one hand,
on the other hand it is worthwhile since you have to take care of every cinch,
you have to take time, and in the end you are excited by the mood and the
patina of each picture.
All
this makes the photo as much as the model, who has to sit still for so long,
adorable. It is a fantastic and an amazing world.
Well,
I did have requests for several exhibitions but due to the lack of time I
unfortunately had to decline all these offers because the locations were too
far away. Up to now I was very happy to be published in various papers,
magazines and on the internet.
With
reference to my work, I am dreaming of publishing a photo book with my
pictures.
Rolland A. Flinta
16.7.12
Monday column: How did I Get Into the Analog Photography
None the less that I’m old enough to start with photography in analogue
times, I waited the time that digital cameras was good enough and cheap enough,
so I could afford one. Before that I didn’t know how to begin. Black and white
photography, with your own developing and printing seemed to me too
complicated, colour photography without intimacy and too expensive. At that time (in the nineties) actually I was
photographing with my parents “focus free P&S”. But only sunsets, home cats
and dogs. So this time I don’t count as my photographic experience. So I waited the time when I had enough money
to buy my own photographic camera. It was a P&S, and digital. But it was
mine own photographic camera. And with it, I could get some photographic
experience. But my photographic years (for me) began to counting only when I get
a DSLR. Only then, for me none the less, I start the learning of the
photographic way.
 |
| Agfa Isola 1, a frame from the first roll of film |
Then deep into the
photography, I started to look at my grandfather’s legacy in different way. I’d
remembered that we have an old camera in the cabinet. I remembered that as a child, from time
to time I was taking it from the cabinet and played with it. But wait. It
seemed to be in working order. Could possibly be still working? Only film was
odd format. The camera was very old, and I wondered could I possibly still get
the film for the camera? At that time I have already heard about medium format
photographic equipment. But for my surprise when I was taking measures for the opening
in camera where the film plane it should be, it was 56 mm in both directions. It
was hard to believe it. The camera was too simple to be a medium format! At
that time I did not know, that 120 format film was a standard in past times,
because of low resolution of film around WW2. Yes Leica format was in use, but
at that time (before the war) the only advantage of 35 mm film was portability
(and number of frames of course). So when I learned all about 120 format film,
I bought some, put it into the camera and start to do some true analogue
photography. The camera was Agfa Isola 1. And of course I had to learn how to
develop the film after exposure. But this is another story.
Matjaž
Matjaž
14.7.12
The LomoWall rises in London
In honor to the upcoming Olympic Games in London, over 15,000 participants-lomographers (from 32 countries) contributed 30,000 photos, rigorously made only with Lomo cameras. Those photos have been made into a mosaic, a 65-meter long wall. The LomoWall will be on display from 13 July 2012 to 6 January 2013 at the Museum of London.
 |
| The LomoWall. Image by twitter user @votredemoiselle. |
The LomoWall is a very good example of a joint effort of the analog community. I think it also proves one of the main aims of the analog community-connecting people (sorry Nokia). The link to the original article is here.
13.7.12
Film Matter: The Schizophrenic Ektar
Kodak Ektar might be the most
sophisticated color neg film we have ever seen, in my (and also others) view.
It was also the latest film emulsion being introduced (in 2008). No surprise
then if it incorporates very advanced features, borrowed mostly from the movie
film industry (2-electron sensitization from Kodak Vision films, for example).
In the 1990's we could only dream about such a (ISO 100) film. While I find
Ektar amazing, I never really made up my mind about it. Why? Because in some
respects it just »looks too good« to me. Yes, I do really like saturated,
contrasty films, but...Ektar's look sometimes almost reminds me of a (high-end)
digital photo-it's too "polished" in my eyes. For some people (or circumstances)
that might be a good thing, while for some not. Yes, all I have been dealing up
to now were scanned negatives (or Frontier-made prints, for that matter). Yes,
scanning Ektar is a breeze. I just think I need to make a decent optical print
from an Ektar negative to get a fair assessment-hopefully soon...That's the
story when your Ektar rolls undergo the standard C-41 processing. But what
happens when you push- or cross-process your Ektar rolls? Let's find it out!
Here we have 3 remarkable examples of cross- and push-processed Ektar from
Hannah, Will and Leo.
Hannah crossprocessed her Ektar
at home in E6 chemistry. The colors are a bit more muted, yet still rich,
there's a bit of bluish cast there, but nothing exaggerated. Probably, a light warming
filter will compensate the color cast (if you wish so). But most importantly,
the film gets an entirely new look. To me, it looks much like the old
trichromie photos. It's like we have a brand new slide film to choose from-who did ever say Kodak discontinued all slide films ? -:)
 |
| Hannah's Ektar processed in E6. Image retrieved from her photostream on Flickr.. |

 |
| Leo's 3-stop push-processed Ektar in C-41. Image retrieved from his photostream on Flickr |
Will and Leo, on the other hand,
push-processed Ektar in C-41 for 2 and 3 stops (ISO 400 and 800), respectively.
Yes, these negatives inevitably pick up in contrast (corrected after scanning),
but their color rendition changes very much as well. In fact, it's like you're
dealing with a completely different (uknown?) color-neg film! Another good
thing is, graininess remains reasonable. Will's photos remind me of earlier
Kodachrome versions, while those of Leo render a more pastel-like color
palette. I shall thank all 3 contributors to gave me the opportunity to show a
side-by-side comparison of different processing versions of Ektar. It's just
amazing how a "vintage" look you
can get from the most modern film! Ektar is definitely a film with
split-personality and it's worth to try all the processing variants shown (and
perhaps some more)!
Silver regards
Mitja
Mitja
Cottage Tip: Keeping Humidity under Control- Part 2
Keeping your photo bags and cases
free from moisture is only part of the story, especially if you keep them in an
enclosed environment, a closet or drawer, without circulating air, where
moisture can accumulate (especially in the cold spots of the house). Over the
years, I have accumulated quite some gear, so I needed to buy a small closet where
to keep my toys. Now, you can buy an air dehumidifier and replenish the
adsorber (calcium chloride) as time goes by. The trouble is, these
dehumidifiers are quite bulky, taking much of your precious closet space, as it
was in my case. It's still better to have this place for storage of more
lenses, isn't it? I came up with a cheap solution: a dehumidifier made from a
soft drink bottle.
 |
| This is all you need: a stocking, a bottle and calcium chloride. |
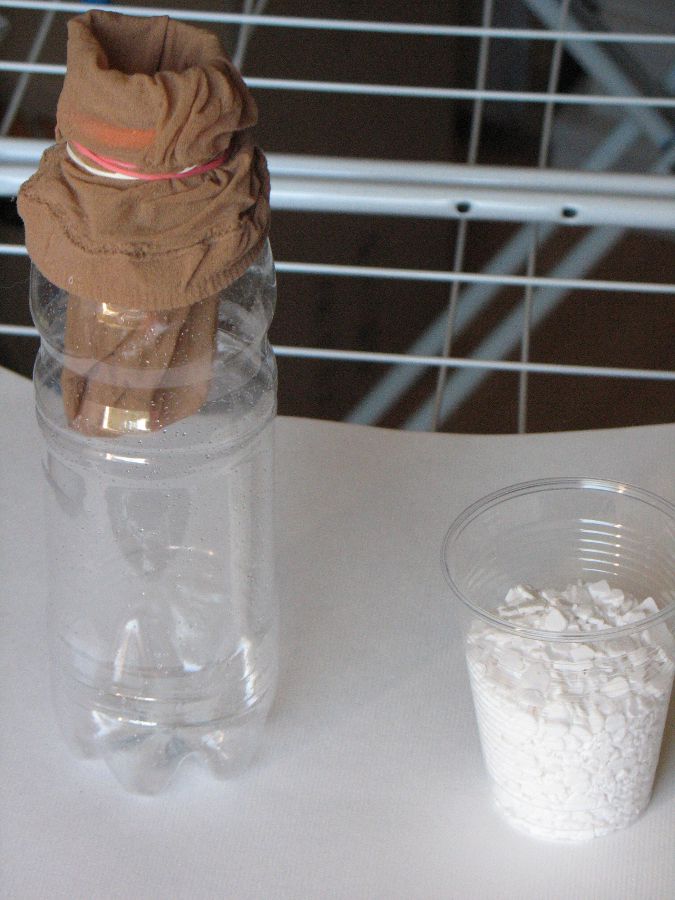 |
| Put the adsorber inside the stocking of the assembled "device". |
Just get a wide-neck bottle and
put inside a short nylon stocking. Fix everything with one or two elastic
bands. This stocking will serve to contain the adsorber (calcium chloride), suspended above bottle's bottom, while the
wide bottleneck ensures more moisture adsorbing capacity. Fill the stocking
with calcium chloride (it is much cheaper to buy it bulk). With time, the
liquid (saturated calcium chloride solution) will accumulate on the bottom.
Dispose the liquid down the drain (it is safe) and replenish the stocking with
fresh calcium chloride as needed. That's it!
 |
| The dehumidifier in its place, along with a thermo/hygrometer. |
The same thing can be made from a
jar, of course (provided you have enough room). Oh, and a good measure is also
to have a small, cheap thermometer/hygrometer located in this place (you can
get one for a few bucks). You will be amazed how much humidity changes,
depending on the weather. Our goal is to keep relative humidity under 60 %,
which is thought to be (mostly) safe in terms of fungal growth. However, r.h. under
35 % is also bad, since lens and camera mechanisms are more likely to get too
dry (less lubrication). Fortunately, the latter condition is less likely to
occur, in most places.
Subscribe to:
Posts (Atom)